Containerization with Docker
Contents
Containerization with Docker#
A container is a running instance of an image. The container image becomes a container at runtime and encapsulates the required environment together with all dependencies. As a result with containers, it is now possible to isolate and transport software making them portable.
An image is built based on a recipe with instructions of the used run-time environment and dependencies. Or in other words, they are equivalent to a script of how you would install the software manually using the command-line interface.

Fig. 3 Illustration of Dockerfile, Docker image and Docker container.#
Container vs virtual machines#
A container encapsulates application code and dependencies in the form of layers which makes it easier when compared to a VM. Unlike a virtual machine (VM) which is an abstraction of the physical hardware with a full copy of an OS, the containers share the machine’s OS system kernel and therefore do not require an OS per application. This makes VM heavier and slower when compared to a container. Moreover, it is possible to run hundreds of containers (whereas it is possible to run only a few VMs - for instance around 4 depending on the system specifications).
How to use Docker?#
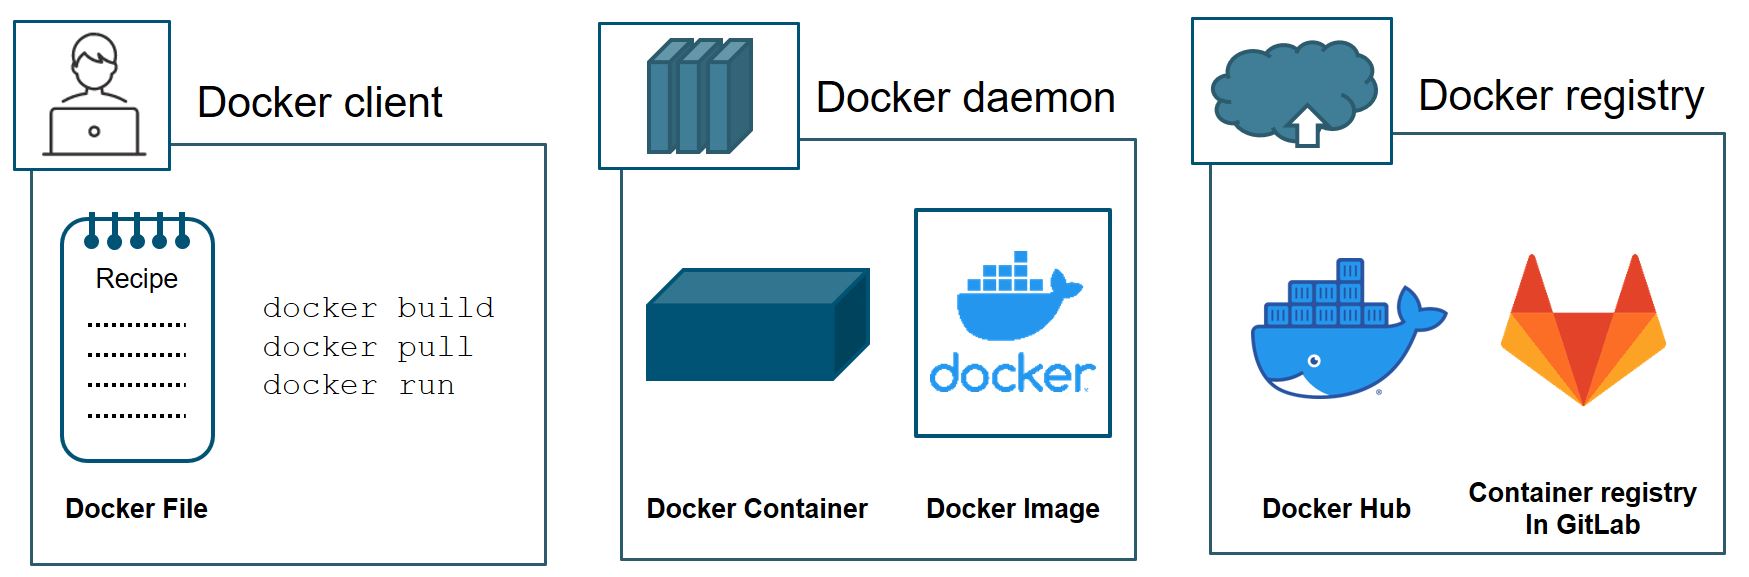
Fig. 4 Illustration of Docker’s client-server architecture#
Writing a Dockerfile#
Docker runs instructions in a Dockerfile to build an image. An example docker script on running a python image:
FROM python:latest

COPY requirements.txt ./
RUN python3 -m pip install -r requirements.txt
The above script firstly loads the latest python image from DockerHub as a base image using the FROM <IMAGENAME> statement. Then the Dockerfile asks to copy a file requirements.txt in the build directory containing a list of required python packages is copied while building. With the RUN statement, python3-pip installs the desired packages.
For more information on writing a Dockerfile, please refer to https://docs.docker.com/engine/reference/builder/.
Building an image#
To build an image follow the following script:
docker build . -t name_of_docker_image:version
To build the dockerfile presented in Writing a Dockerfile, an example is:
docker build . -t my_new_software_image:0.0.1
Running a container#
With docker run IMAGE_NAME, one can run the above docker image. If you would like to open an interactive bash within the container, use:
docker run -it name_of_docker_image:version
Hosting an image in a registry#
As we use GitLab for this workshop, we demonstrate hosting an image in GitLab’s Container Registry. You should be able to see the registry by first going to the Project page in GitLab > Packages & Registries > Container Registry.
However, you need to set up an access token so as to authorize pushing into the container registry. For this:
Step 1: Go to ‘GitLab user settings > Access Tokens’
Step 2: Choose a suitable name and check
apias the token scope - see figure below
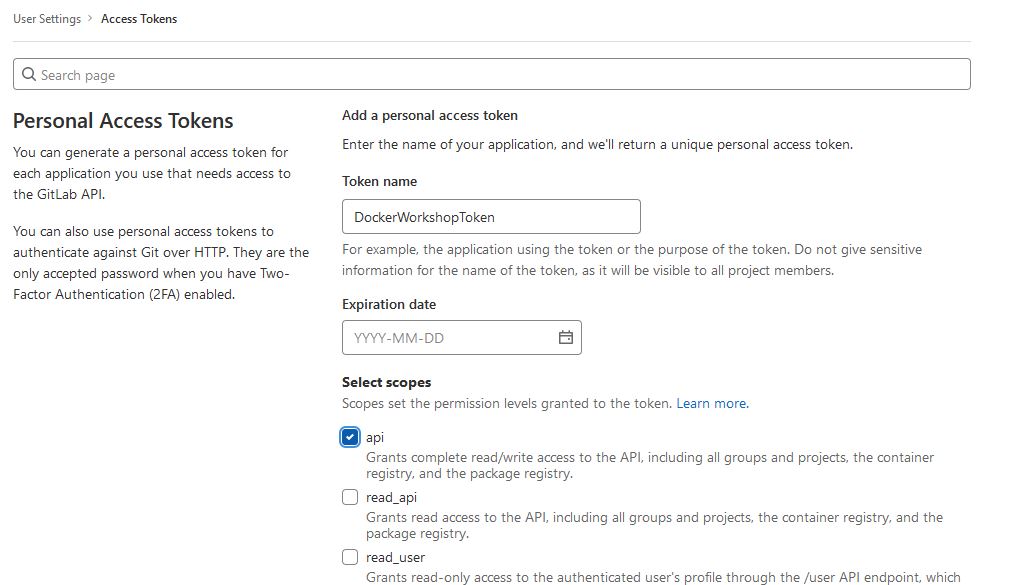
Step 3: Click on
Create personal access tokento receive your token
Warning
Access tokens are sensitive! Do not share or put it in your codes directly. Secure it safely within a file in your system and supply on demand.
With an access token, now you can log in to GitLab’s Container Registry and pull or push container images. The following commands performs these operations (the same commands can be seen on your registry page):
docker login git.rz.tu-bs.de:4567 -p <ACCESS_TOKEN>
docker build . -t git.rz.tu-bs.de:4567/<PROJECT_PATH>:VERSION
docker push git.rz.tu-bs.de:4567/<PROJECT_PATH>:VERSION
Ship an image#
An advantage of using Docker containers is that they are portable. One way to ship or archive containers are to host the images centrally in a registry (for instance in DockerHub or GitLab’s Container Registry). Another way is to store them as compressed *.tar files. The following commands can be used to export and load images to and from tar format:
docker save --output archive.tar <IMAGE>
docker load --input archive.tar
Docker cheatsheet#
Following is a consolidated list of useful Docker commands:
# list all available local images
docker images

# list all available local containers
docker ps

# build an image
docker build . -t name_of_docker_image:version

# pull and push an image from and to a registry (Default is to look in DockerHub)
docker pull name_of_docker_image:version
docker push name_of_docker_image:version

# hosting container in GitLab's container registry
docker login git.rz.tu-bs.de:4567 -p <ACCESS_TOKEN>
docker build . -t git.rz.tu-bs.de:4567/<PROJECT_PATH>:VERSION
docker push git.rz.tu-bs.de:4567/<PROJECT_PATH>:VERSION

# run a container using interactive bash shell
docker run -it name_of_docker_image:version

# copy a file from local system to a container
docker cp <SRC_PATH_TO_FILE_IN_SYSTEM> <CONTAINER_ID>:<DESTINATION_PATH_IN_CONTAINER>

# stop a container
docker stop <CONTAINER_ID>

# save and load docker image as tar
docker save --output archive.tar <IMAGE>
docker load --input archive.tar
Containerization in HPC#
If you are using tools to run your code in parallel like MPI and CUDA, you might want to consider Singularity instead of Docker for better performance. However, you can still develop your container using Docker and then convert it at a later stage into Singularity image - which is possible. For details, please refer to:
Hands-on exercise#
During the hands-on session, we demonstrate with a light weight python image (best practice). However, you are recommended to do the same with a heavier ubuntu image for the base.
With reference to the demonstration where we used a python image to create a docker image, create a new
dockerfilewhere anubuntu:latestimage is used. You can then install python in the OS withRUNwhere you can callapt-get updateandapt-get install -y --no-install-recommends python3 python3-pip.Host your built image using
ubuntuin GitLab’s container registry.Run your code in the built container using VS code.